

Unraveling Coolant Leaks: Common Causes, Symptoms, and Fixes
A coolant leak signifies that your vehicle’s sealed cooling system is losing antifreeze, jeopardizing its ability to manage engine temperature and risking severe overheating. Identifying the early indicators of coolant loss can avert costly damage like warped cylinder heads, seized water pumps, and catastrophic engine failure. This comprehensive guide delves into why leaks develop in crucial components—from radiators and hoses to head gaskets—how to spot the tell-tale signs yourself, and the repair or replacement options that restore your vehicle’s dependability. You’ll learn to diagnose failures through visual inspection and pressure tests, understand the perils of driving with low antifreeze, and discover maintenance practices that keep your cooling system in peak condition. Throughout, Blackstone71’s seasoned diagnostic expertise and repair services will guide you on when to seek professional assistance.
What Are the Most Common Culprits Behind Coolant Leaks?
Coolant leaks most frequently originate from worn seals, corroded metal parts, or general wear and tear in key cooling system components. As your engine circulates antifreeze through the heat exchanger, the constant pressure and thermal cycles expose vulnerabilities in hoses, the radiator core, and mechanical seals. Pinpointing the exact component at fault is paramount, as each failure demands a specific repair strategy. Blackstone71’s technicians employ precise inspections and pressure testing to pinpoint leak sources, ensuring only the compromised part is serviced—or replaced—before refilling and flushing the system. The most common offenders include radiator core corrosion, water pump seal failure, hose deterioration, head gasket breaches, and heater core corrosion.
How Do Radiator Leaks Lead to Coolant Loss?
Radiator leaks occur when corrosion, physical impact, or thermal stress creates openings in the heat exchanger core, allowing pressurized antifreeze to escape. The radiator’s primary function is to act as a heat exchanger, transferring engine heat to the surrounding airflow. Over time, coolant additives, road salts, and high operating temperatures gradually erode the copper or aluminum fins and tubes. Even a minuscule pinhole in a coolant passage can spray antifreeze when the system is under pressure, leading to noticeable puddles beneath the front of your vehicle and fluctuating coolant levels.
Before undertaking any repairs, a technician will conduct a coolant pressure test to precisely locate leak points and meticulously inspect the end tanks and core for any cracks or pinholes. If corrosion has significantly compromised the core’s integrity, a complete radiator replacement is the recommended course of action to restore optimal heat dissipation and prevent recurring issues. In less severe instances, professional-grade sealants and core patching might offer a temporary fix, but long-term reliability invariably points to replacement.
| Component | Failure Mode | Typical Cause |
|---|---|---|
| Radiator | Core Corrosion | Electrochemical degradation of internal tubes |
| Radiator | End-Tank Cracks | Stress from thermal cycling and minor impacts |
| Radiator | Seal Degradation | Aging O-rings and chemical breakdown from coolant additives |
These failure modes underscore why a compromised radiator can rapidly deplete coolant and trigger overheating, making timely replacement the most reliable solution.
Research indicates that specific recommendations in materials and design can significantly reduce long-term failure rates in various radiator types.
Radiator Design and Material Recommendations for Reduction of Failure Modes
ABSTRACT: Specific recommendations, based on a referenced failure mode study, are made for corrective actions in materials and design to reduce long-term failure rates in passenger car and light truck applications of brazed aluminium radiators, mechanically bonded aluminium radiators, and copper radiators with plastic tanks. Suggestions are made for improving the correlation of short-term laboratory tests with in-service failure modes and relative failure rates. Conclusions are drawn regarding estimated ten-year failure rates based on the adoption of the suggested corrective actions. Brazed aluminium radiators emerge as the most cost-effective long-life configuration, and perhaps as the only configuration that will meet the author’s definition of a ten-year radiator.
What Signs Point to Water Pump Failure and Resulting Leaks?
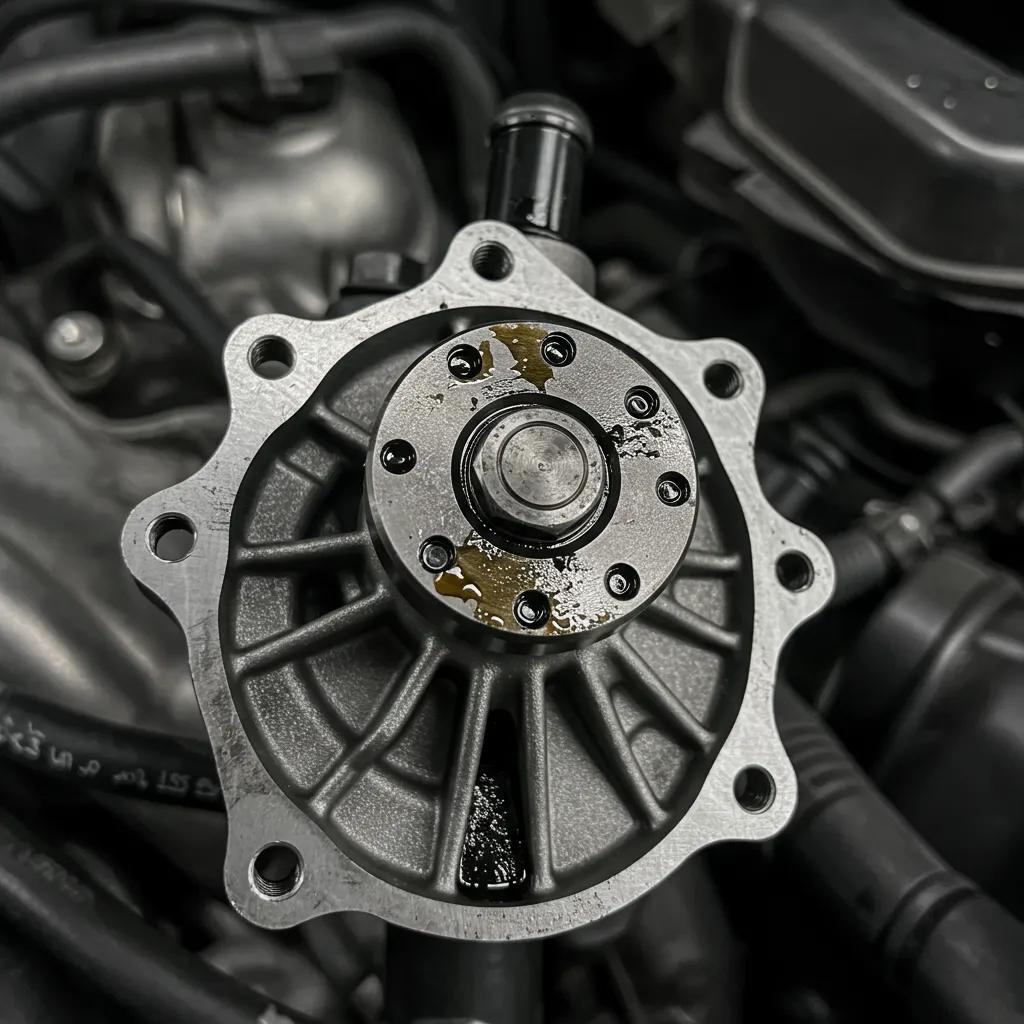
A water pump leak typically occurs when worn bearings or a failing seal allow coolant to seep from the pump’s housing. The water pump is responsible for circulating antifreeze throughout the engine and radiator; its internal shaft seal is designed to prevent coolant from escaping where the drive shaft enters the housing. When this seal deteriorates—often due to age, contaminated coolant, or excessive heat exposure—it can no longer contain the pressurized fluid, leading to consistent drips from the pump’s designated weep hole.
Common indicators of water pump failure include a visible trail of coolant along the engine block, an audible whining or grinding noise suggesting bearing wear, and intermittent overheating as the pump’s circulation efficiency diminishes. Given that a malfunctioning water pump directly threatens engine cooling and can lead to bearing failure, replacement is the standard repair procedure. Blackstone71’s technicians expertly remove the old pump, meticulously inspect the drive belt and pulley alignment, install a premium OE-grade replacement, and refill the system with the correct antifreeze mixture. This process restores reliable coolant flow and prevents future seal-related issues.
Analysis of numerous failed water pump seals reveals that a common failure mode in automotive applications is “filming,” where deposits form between sealing surfaces.
Premature Failure of Water Pump Seals in Automotive Applications
ABSTRACT: Automotive water pump seals that have failed prematurely during in-service use have been characterised using a variety of analytical methods. Nearly one hundred failed seals, collected over the past several years from local automotive dealerships, major automotive manufacturers, coolant-related fleet tests, and pump seal manufacturers, have been examined as part of this study. This has enabled us to determine the chemical composition and morphology of surface deposits on failed seals and to classify their failure mode. The main failure mode found for domestic in-service automobiles is filming, a term used to describe a failure type in which deposits form between the sealing surfaces, resulting in a leak path. This paper reports on the composition, morphology, and possible causes of in-service filming failures. In addition, the results of this study will be contrasted with those reported in other studies that found film transfer as the main type of failure.
How Do Coolant Hose Ruptures Occur and What Are Their Consequences?
Coolant hoses are vital conduits for antifreeze, transporting it between the radiator, engine block, and heater core. Their rubber construction is susceptible to degradation over time, leading to bulges, cracks, and eventual burst failures under system pressure. Constant exposure to heat, the chemical composition of coolants, and engine vibrations cause rubber hoses to become either hard and brittle or excessively soft and spongy. When the internal reinforcing cords break down or hose clamps loosen, hoses can split at high-stress points, resulting in a sudden and significant loss of coolant.
A burst hose leads to an immediate and drastic drop in antifreeze levels, triggering rapid engine overheating and potentially visible plumes of steam escaping from under the bonnet. Drivers might also notice a decline in heater performance, detect sweet antifreeze odors within the cabin, or see low coolant warning lights illuminate. Replacing all aging hoses as part of a comprehensive cooling system overhaul effectively eliminates hidden weaknesses and ensures consistent antifreeze delivery across all driving conditions.
What Are the Symptoms and Causes of Head Gasket Failure?
A failed head gasket allows coolant to leak into the combustion chambers or mix with the engine’s oil or exhaust passages, often indicated by white exhaust smoke, milky engine oil, or unexplained coolant loss. The head gasket is critical for sealing the interface between the cylinder head and the engine block, maintaining combustion pressure and keeping coolant and oil flows separate. Overheating or manufacturing defects can cause the cylinder head to warp or the gasket itself to degrade, creating unintended pathways for coolant to enter the combustion chamber or oil galleries.
Drivers may observe persistent overheating, a noticeable drop in coolant levels without any visible external leaks, frothy or discolored engine oil, and white steam emanating from the exhaust. Repairing a blown head gasket is a complex procedure that involves removing the cylinder head, machining or replacing it to ensure flatness, installing a new multi-layer steel gasket, and meticulously reassembling the engine. Due to the intensive labor involved and the need for precise tolerances, this repair often exceeds £1000, reflecting its complexity and the critical importance of a perfect seal.
How Can Heater Matrix (Heater Core) Leaks Impact Your Vehicle?
A leaking heater matrix, commonly referred to as the heater core, results in coolant escaping into the vehicle’s cabin, leading to foggy windows, damp carpets, and a distinct sweet antifreeze smell inside the car. The heater core functions as a compact radiator for the passenger compartment, utilizing hot coolant to warm the air drawn into the cabin. Corrosion, galvanic activity, or prolonged coolant contamination can cause the internal tubes to fail, allowing antifreeze to drip into the ventilation system.
Symptoms include low coolant warning lights without any external puddles, a steamed-up windscreen when the heating system is engaged, and a soggy floor mat, typically on the passenger side. Because accessing the heater core often necessitates extensive dashboard disassembly, professional removal and replacement are highly recommended. Once a new matrix is installed and the system is flushed, the heating system regains its full performance, and the cabin remains dry and odor-free.
How Can You Identify the Signs of a Coolant Leak?
Detecting coolant loss early relies on recognizing visual, auditory, and performance cues that signal fluid escaping from the cooling system. A dripping or pooling fluid beneath your car, a steadily rising engine temperature gauge, and distinct amber or green antifreeze stains on engine components are clear indicators of a leak. Warning lights on the dashboard, such as the “Check Engine” or low-coolant indicators, frequently illuminate when fluid levels drop below safe operational thresholds. Furthermore, unusual sweet or musty odors emanating from the engine bay or the cabin can signal evaporating antifreeze. Vigilantly monitoring these signs helps prevent undetected leaks from escalating into critical overheating events and severe engine damage.
Before seeking professional assistance, conduct a thorough inspection under the bonnet: look for damp hose connections, corroded clamps, and tell-tale stain marks around the radiator cap and water pump. Listening for hissing sounds under the bonnet immediately after shutting off a hot engine can reveal pressurized coolant escaping from small cracks. By combining these observations, you can form a clear picture of where and how the system is failing, guiding you toward either a simple DIY fix like tightening a hose clamp or a professional inspection at Blackstone71.
What Visual Clues Indicate a Coolant Leak Under Your Vehicle?
Common visual indicators include distinct pools of bright green, yellow, or pink fluid beneath the engine, often with a slightly oily sheen and a characteristic sweet odor. Coolant drips may accumulate under the radiator, water pump, or hoses, leaving behind a crusty residue as they dry. Inspect your driveway or garage floor after the car has cooled; clearly defined, colored puddles almost invariably point to antifreeze rather than engine oil or brake fluid.
How Does Engine Overheating Signal a Coolant Leak?
Engine overheating occurs when the cooling system is unable to circulate sufficient antifreeze to effectively dissipate heat, leading to a rapid increase in temperature gauge readings or the illumination of a red-warning light. A reduced coolant level significantly diminishes the system’s heat transfer capacity, meaning even brief periods of driving can push the engine into a critical thermal state. Overheating also poses a serious risk of warping metal components and damaging head gaskets, underscoring the urgency of addressing leaks promptly.
What Warning Lights and Odors Are Associated with Coolant Leaks?
Modern vehicles are equipped with “low coolant” or “engine coolant temperature” warnings that activate if antifreeze levels fall below a safe threshold. You might also encounter a check-engine light, often triggered by overheating sensors. A distinctive sweet, syrup-like smell originating from under the bonnet or within the cabin frequently accompanies evaporating antifreeze, making it a reliable olfactory cue for leaks.
How Do Various Cooling System Components Contribute to Coolant Leaks?
Each component within the cooling system—from caps and reservoirs to seals and plugs—presents unique potential leak points where material fatigue or pressure-related faults can manifest. Radiator caps and expansion reservoirs are designed to maintain system pressure; when the internal valve fails or a crack develops, vapor or liquid coolant can bypass through the cap or reservoir, leading to a reduction in overall coolant volume. Thermostat housings rely on gaskets to create a seal around coolant passages; gasket deterioration or cracks in the housing itself can result in weeping leaks. Freeze plugs and O-rings serve as small seals in block passages and various connection points; corrosion or age-related seal shrinkage can create tiny but persistent seepage points. Understanding these component-specific failure modes is crucial for targeting repairs effectively and restoring complete system integrity.
Why Do Radiator Caps and Coolant Reservoirs Sometimes Fail?
Radiator caps incorporate a pressure relief valve calibrated to maintain a specific psi within the cooling system. Valve fatigue or corrosion of the spring mechanism can prevent proper sealing, allowing vapor and liquid antifreeze to escape through the overflow line. Reservoir tanks, often constructed from plastic, can develop hairline cracks due to repeated heat cycling, leading to slow but continuous fluid loss.
What Causes Thermostat Housing Leaks?
The thermostat housing encloses the valve that regulates coolant flow based on engine temperature. A compromised gasket or a warped housing can allow coolant to seep along the engine block. Prolonged exposure to high temperatures and repeated expansion and contraction cycles can weaken the seal, resulting in visible wetness around the housing flange.
How Do Freeze Plugs and O-rings Contribute to Coolant Loss?
Freeze plugs are metal discs fitted into holes in the engine block, designed to protect against coolant expansion during freezing temperatures. However, corrosion can gradually erode the plug’s surface, leading to seepage. Similarly, O-rings used in sensor ports and various connection points degrade over time, shrinking and allowing pressurized antifreeze to weep from otherwise sealed passages.
What Are the Dangers of Driving with a Coolant Leak?
Continuing to operate your vehicle with an active coolant leak significantly increases the risk of severe engine damage, ranging from warped cylinder heads and blown gaskets to complete engine seizure. As the volume of antifreeze decreases, the cooling system’s capacity to absorb and dissipate heat is compromised, leading to runaway temperatures that can melt pistons or fracture engine blocks. Even short drives with insufficient coolant can create residual hot spots that crack critical engine components.
Prompt diagnosis and repair are essential to avoid repair bills that can escalate dramatically—from a simple hose replacement (£100–£300) to a full engine rebuild (£2000+). By addressing leaks swiftly—whether through DIY inspections or professional diagnostics at Blackstone71—you protect your engine’s health, maintain optimal performance, and preserve your vehicle’s value.
How Can Coolant Leaks Lead to Engine Overheating and Damage?
A reduction in antifreeze volume directly impairs the cooling system’s heat transfer efficiency, causing engine temperatures to spike and metal components to expand beyond their designed tolerances. Prolonged overheating can warp cylinder heads, degrade lubricating oil properties, and potentially crack engine blocks, often necessitating extensive machine shop work or complete engine replacement.
Why Is Early Diagnosis Crucial for Preventing Major Repairs?
Identifying and sealing a minor leak effectively halts further coolant loss and prevents the cascading chain reaction of overheating, metal fatigue, and gasket failures. Early intervention ensures repair costs remain in the low hundreds rather than escalating into the thousands, and it crucially avoids extended downtime associated with major engine overhauls.
How Can You Diagnose a Coolant Leak at Home and Professionally?
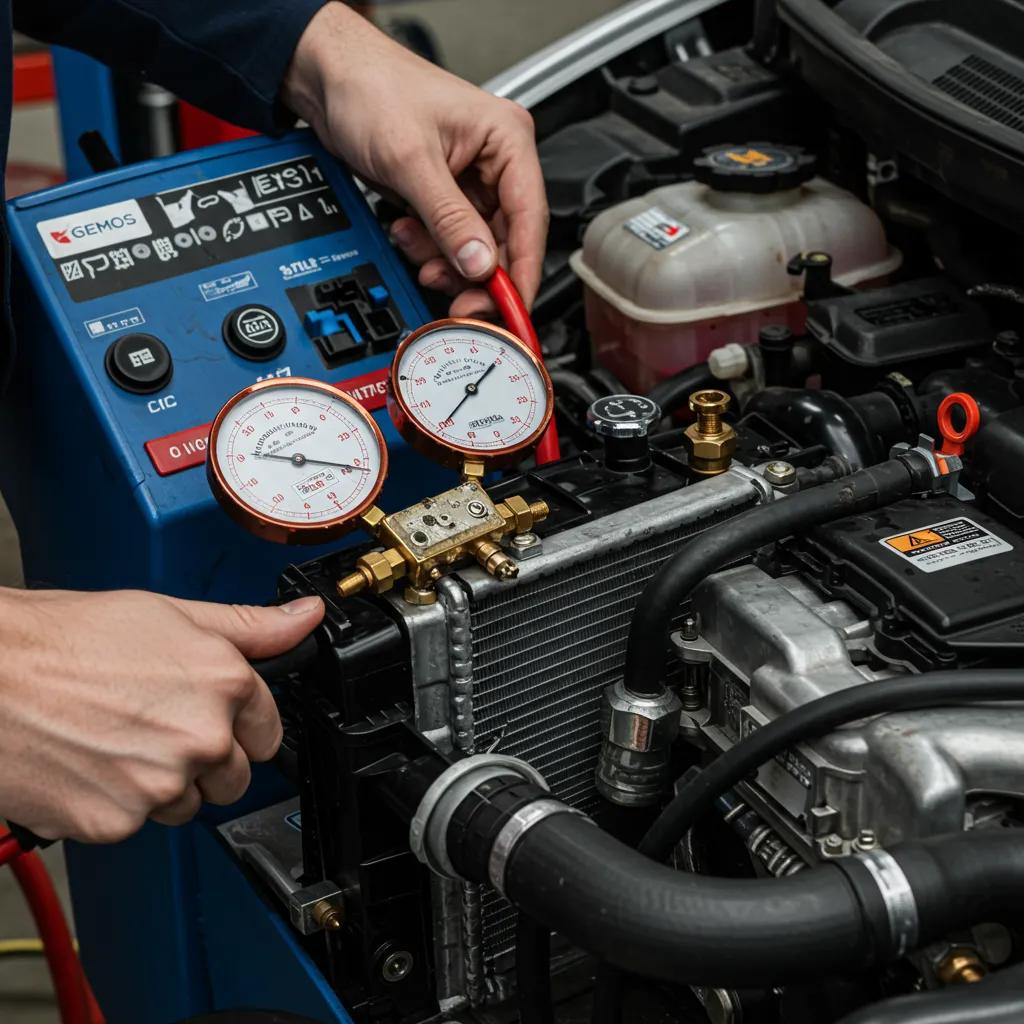
Diagnosing a coolant leak typically begins with straightforward visual and manual checks, progressing to more advanced methods like pressure testing and dye inspection for identifying hidden failures. Home inspections involve carefully examining hoses, clamps, and connections for any signs of dampness, assessing hose flexibility, and reviewing coolant levels when the engine is cold. Professional diagnostics utilize specialized pressure testers that pressurize the system to its operating psi, revealing subtle leaks, and employ UV-sensitive dyes that glow under black light, effectively detecting faults in hard-to-reach areas. Combining both approaches ensures a comprehensive identification of the leak source before proceeding with repairs.
What Are the Steps for Visually Inspecting Coolant Hoses and Components?
Begin with a cold engine and the bonnet open. Conduct a visual scan of all hoses, radiator end tanks, heater core pipes, and water pump seal areas, looking for any wet spots or crusty residue. Gently feel the hoses for any soft bulges or hard, brittle cracks. Inspect all clamps for tightness and signs of corrosion. Finally, check the coolant reservoir level against the “Min/Max” marks and note any unexpected drops over a period of days.
How Does Pressure Testing Help Detect Hidden Leaks?
A cooling system pressure tester replaces the radiator cap, allowing the technician to pressurize the system to its specified operating psi. Maintaining this pressure while the engine is off is crucial for highlighting leaks that only manifest under load. Any escaping air or fluid directly pinpoints the faulty component—whether it’s a hose joint, a housing seam, or a core tube—enabling accurate repair decisions without guesswork.
What Role Do UV Dyes and Leak Detection Tools Play?
Introducing a UV-reactive dye into the coolant and running the engine allows the tracer to circulate throughout the system. Under the illumination of a UV lamp, any leaking dye will glow brightly at the precise location of the defect, even if the fault is minute or concealed deep within the engine bay. This non-invasive method significantly saves time and ensures that no failure mode goes unnoticed before repairs are scheduled.
What Are the Typical Repair Options for Coolant Leaks?
Repair strategies are tailored to the specific failed component and the severity of the leak. Radiators can sometimes be repaired with sealants for minor pinholes after a pressure test, but extensive corrosion or end-tank damage necessitates a complete replacement. Water pump failures always require a full pump replacement, including a new shaft seal and bearing. Hoses, caps, and reservoirs are typically swapped out in matched sets to prevent future wear-related failures. Head gasket replacement and cylinder head machining are essential for restoring proper combustion and coolant isolation but involve intensive labor. Heater core leaks demand dashboard removal and core replacement to halt cabin seepage. Each option represents a balance between cost and long-term durability, with professional workshops like Blackstone71 providing transparent estimates and utilizing high-quality parts to ensure lasting results.
When Is Radiator Repair or Replacement Necessary?
Minor core pinholes might be temporarily sealed, but significant corrosion or damage to the end tanks mandates a full radiator replacement. Replacement guarantees consistent heat exchange performance and long-term system reliability.
How Are Water Pump Failures Addressed?
Technicians begin by draining the cooling system, removing drive belts, unbolting the old pump, thoroughly cleaning the mounting surface, fitting a new water pump with precise torque specifications, replacing gaskets, and finally refilling and bleeding the system to restore optimal coolant flow.
What Does Head Gasket Repair Entail?
Head gasket repair involves a comprehensive engine disassembly to remove the cylinder head, precision machining or replacement of the head to ensure flatness, installation of a new multi-layer steel gasket, meticulous reassembly torqued to factory specifications, and a complete system refill with fresh antifreeze.
How Are Coolant Hose and Heater Matrix Leaks Repaired?
Worn coolant hoses and heater hoses are removed and replaced with OEM-grade rubber components, all clamps are renewed, and the system is thoroughly pressure tested. Heater matrix leaks require access through the dashboard to remove and install a new core, followed by a system flush and refill.
How Can You Prevent Coolant Leaks Through Regular Maintenance?
Proactive preventive maintenance is key to extending the lifespan of your cooling system and minimizing unexpected breakdowns. Regularly inspecting hoses, clamps, and connections for signs of wear, checking coolant levels monthly, and replacing antifreeze according to the manufacturer’s recommended interval (typically every two years) are crucial steps in preventing corrosion and seal degradation. Using the correct type and concentration of coolant ensures optimal freeze and boil-over protection. Professional cooling system diagnostics—including pressure testing and electronic sensor checks—provide early warnings of developing issues, allowing for planned repairs rather than costly emergency call-outs.
By adopting these best practices, drivers can maintain consistent engine temperatures, preserve component integrity, and avoid the cascading expenses associated with unaddressed leaks. Blackstone71 offers scheduled cooling system health checks and thorough flush services designed to keep your vehicle operating safely and efficiently.
What Are the Recommended Practices for Cooling System Maintenance?
A monthly visual inspection of hoses and reservoir levels, coupled with an annual pressure test and coolant flush, effectively removes contaminants, restores additive balance, and prevents internal corrosion.
How Frequently Should Cooling System Components Be Inspected and Replaced?
Inspect hoses, clamps, and caps at least twice annually; replace antifreeze every two years or 30,000 miles; consider replacing hoses and belts around the 60,000-mile mark to preempt age-related failures.
What Are the Advantages of Professional Cooling System Diagnostics?
Professional diagnostics can identify subtle leaks, faulty pressure valves, and sensor malfunctions before they become apparent, thereby preserving engine health, improving fuel efficiency, and significantly reducing the likelihood of unexpected repair costs.
A coolant leak, if left unresolved, can rapidly escalate into serious engine damage. By understanding the common failure points—from the radiator and water pump to hoses and head gaskets—you can learn to recognize the early symptoms, perform basic home inspections, and seek professional diagnostics when necessary. Timely repairs, such as replacing corroded radiators, renewing worn water pumps, or resealing head gaskets, are vital for restoring system integrity and preventing overheating. Implementing regular maintenance routines, including coolant flushes and pressure tests, safeguards component longevity and ensures your engine performs at its best. Should you require expert diagnosis or repair services, Blackstone71’s experienced technicians are ready to provide reliable cooling system solutions and get you back on the road with complete confidence.